It may sound strange to some. After all, digiKam is for digital cameras, it says so in its very name. However, nowadays all photographs eventually end up in a digital format, and so I tend to think of photographic film as a form of light sensor with certain, quite favorable qualities. This article, split into two installments, deals with film photography in a digital world, and a tool I wrote to support its use. This first part is about the why. The second part will demonstrate the tool and explain how to use it.
How it all started
A couple of weeks ago I started working on a new tool for the digiKam photo management application. My newly discovered love for shooting 35mm film culminated in buying a Canon EOS-3 SLR and a scanner and I have spent a lot of time trying to get good results from scanning the color negatives directly. It's a problematic process, to say the least.
One of the my reasons for shooting film is how it presents color on the final paper prints, but it's tough to recreate that if you don't scan from prints (it's expensive) but from the developed negative. Getting rid of the orange mask is a trivial challenge, but going from there to a pleasantly looking image on a computer LCD is not. How to develop the films "signature color" without non-reproducible manual intervention?
I started with VueScan which presents itself to be well set for color negative scanning. It got some good, initial results for easy images, but its internal automation is too easily thrown off path. Photos of blue sky? Forget it, the automatic correction creates a muddy gray or mauve but no blue. Also, the amount of film profiles is very limited, for example there are only few Kodak films and none of them are recent. No "New Portra" 160 or 400, no Ektar 100. And yes, you need those profiles to go from a raw, linear scan to something that looks like an photo. Another thing about VueScan is that I don't know what it does and I keep asking myself, is this really how Kodak Gold should look? This ultimately leads to the question of how to recreate the color "signature" of a certain film instead of just getting an "image with nice colors".
Searching for inspiration
When googling for what others do one finds a lot of descriptions of "best settings" for Silverfast or VueScan but nothing that you could devise a script detailing the steps one would need to perform in order to go from Negative to final Image with basic image manipulation tools. Still Google spit out an inspiring article from fellow blogger Obakesan, a Negative-scanning tutorial providing basic input on how to perform most of the necessary steps with the simple level adjustment tool found in any image manipulation software. That article was what eventually culminated in the tool I have written and that just got released together with version 2.6.0 of digiKam, and which I christened, unceremoniously, "Color Negative Inverter", for this is what it does.
The tutorial had a lot of steps to perform manually and didn't fulfill my requirement for reproducibility of images, like hand-adjusting the levels and then manually correcting the colors. You get a photo that looks good as a result but your wife will tell you that her dress had a totally different color that day. Trying to achieve that I went looking for characteristics of film from which I could compute the necessary settings.
How color film works
Chemical film in any format comprises of a plastic carrier film that is coated with light sensitive material. Color negative film for the standard C41 process has three such layers which are sensitive to red, green and blue light and then form a cyan, magenta and yellow color dye. The more light of a specific wavelength hits the film, the higher the density of the resulting color dye. The relation between wavelength, illumination and density is known and published by the film manufacturers in data sheets, like this:
Looking at these one finds that the dye densities for cyan, magenta and yellow map a relatively small density range to a quite large illumination range, and that density range decreases drastically from cyan to magenta to yellow. This mapping has to be translated into parameters for a computer algorithm.
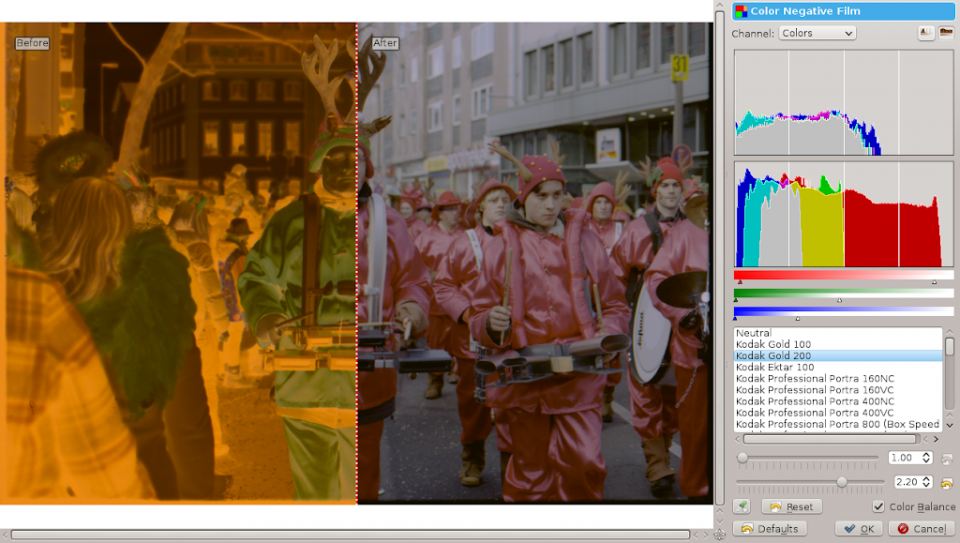
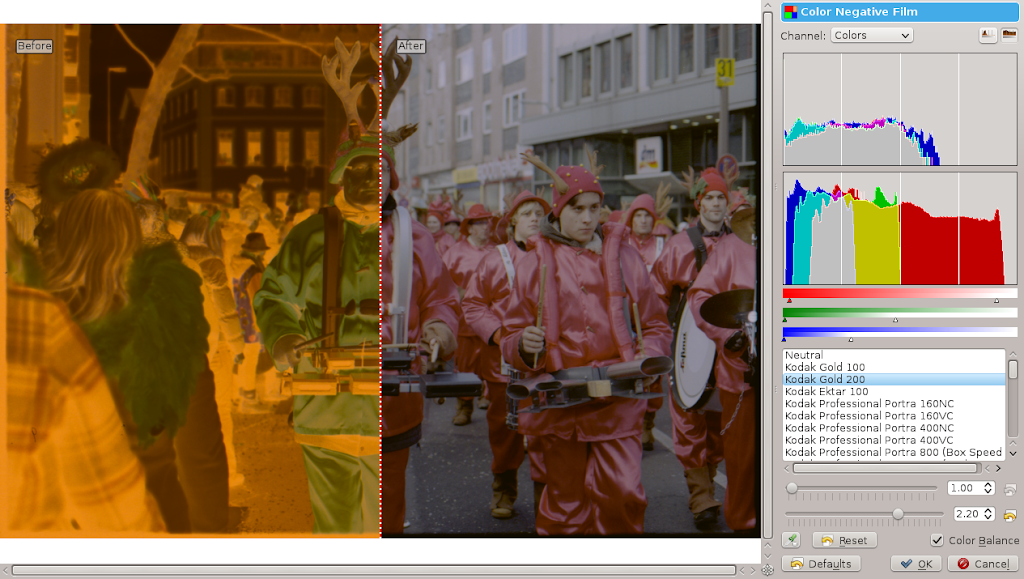
How the Color Negative tool works
First of all, the input data is a linear, raw scan of the film negative, with no corrections like white balance, gamma or tone curve applied. Also, it should be a well exposed scan, using the full dynamic range of the scanner, without clipping of any color channel to null or full scale. Each channel should be represented with 16 bit. The color profile of the scanner output should be known. Your scan program must be able to provide this. I know no free Linux scan program doing that, so I bought VueScan by Hamrick Software. The histogram of such a scan will look like this:
As one can see, the red color channel occupies the widest range while blue has the smallest range. The brightest values of each channel together represent the color of the orange mask. If you adjusted the levels so that the maximum input of each channel matched these values, the orange mask would turn into bright white. This is what the Color Negative tool does to remove the mask.
To map the input range for each channel, one also needs to compute the minimum input. For this task the density profile of the film is used. For Kodak Gold 200, the maximum density just before the shoulder (around the 0.0 point of the exposure axis in the above diagram) is (1.53, 2.00, 2.40) for R, G and B, on a log10 scale. Since we're still talking about a negative image, the maximum density is equal to the minimum brightness. You just need to transform the logarithmic density from the diagram into a linear value. Then apply a gamma correction (globally and to each channel to balance the colors) and you're pretty much there, you just need to invert the image.
This is as far as the Color Negative tool will take it. From there it's a bit like working with RAW files from a digital camera: You may need to fix the levels and adjust the white balance and tone curve, or use any of the digiKam tools to tweak the photo until it suits your taste.
Collecting film profiles and samples
As best results are achieved with matching profiles for each film, I had to collect data sheets. Not many companies nowadays make C41 film and most of them are by either Fuji or Kodak. I tried finding as many recent and not so recent or even discontinued film data sheets as Google would find. I actually tried verifying the profiles by shooting a roll of each to see how it goes, but some are hard to find today. I think I achieved a good coverage but for some brands like DM Paradies that are re-branded Kodak or Fuji film stock no data sheets exist. For example, some say DM Paradies is Kodak Gold, but looking at the scans I somehow doubt that. If you find data for obscure brands my tool doesn't support yet, I'd be happy to hear about it. Just send me the PDF containing a density diagram like I've shown above. You can additionally send scans to verify the result, just make sure they are linear uncorrected scans with 16 bit per channel. They should also have a bit of the orange mask color around the actual photo. Even better, send me a roll of the film 🙂
What next?
The basic functionality of the tool is complete, but I would like to add a few features and of course more profiles. One feature will be automatic detection of orange mask values, which is pretty easy to do. For now there is only a color picker so you need to perform a few clicks manually, but fortunately you only need this once for every roll of film, if your scanner has consistent output from picture to picture within a roll. The automatic white point calculation for the negative only requires a bit of searching in the histogram bins and therefore will be easy to do. Suggestions for improving the user interface and also the quality of the conversion? I would certainly like to hear your suggestions.


Hi
or you could just remove it yourself by setting the levels youself. Its pretty easy to see where R G and B run out using a tool like photoshop (press Ctl while sliding to see clipping) and then note these values and apply them for each film (assuming the lighting is the same) or apply it by hand for "case by case"
For Example:
http://cjeastwd.blogspot.com.au/2009/10/quick-negative-scan-tutorial.html
http://cjeastwd.blogspot.com.au/2009/04/negative-film-scans-on-nikon-coolscans.html
🙂
Yes, that's how I started out, but it's not working well for all types of photos. For example, take a photo of the blue sky with just a flock of migrating ducks. I bet you won't be able to figure out the color of the sky if you go just by the histogram and adjust the levels. The sky will most likely turn into some shade of gray. I found that using the density curves gives me better results.
exactly. But one should not 'just go by the histogram'. Rather one should build a 'feel' for your film and media and get an idea of what you're looking at. Then you can say "Oh Kay, that's a bird on a blue sky, so I'll go with my 'regular' template as a beginning and tweak a little from there"
Software can help you, but as a human you can learn more about it than a bit of code
🙂
" but fortunately you only need this once for every roll of film, if your scanner has consistent output from picture to picture within a roll"
assuming your lighting didn't change 🙂
If your scan contains a bit of the unexposed film material between the frames the automatic calculation will pick it up. Perfect reference 🙂
Hi!
Discovered the color negative tool in DigiKam, googled and found your blog. I had exactly the same problems (blue sky...) with Vuescan and especially the Kodak Gold and Superia Films. Great to have an alternative in DigiKam now! Will try it during the next days.
Regarding the DM Paradies Films:
In a German analog photographers forum someone stated, that the Kodak Gold films, which are delivered to Europe (and are sold in Germany as Kodak "Farbwelt") are not the same emulsions like the American ones - they are adapted to the European taste. Further it was stated, that the DM Paradies films are European Kodak Gold films, but one Generation older versions of the emulsion-type.. There seems to be some truth in it, as it at least could explain your difficulties with the DM Paradies films ...
Many thanks for the color negative tool and sorry for my bad english ...
Bernd
Me again.
Tried the color negative tool with some Kodak and Superia negatives. WOW! Exactly the same colors as the contact prints. To achieve this with Vuescan was impossible ...
Very good work!!!
Bernd
Hi Bernd,
I'm glad that it works well for you. You are probably the only other person besides me who is using it 🙂 I have a conference talk on Sunday at KDE Akademy in Tallinn (5min slot in the lightning talks session) about the tool. Hopefully this will inspire more users!
Hi Matze!
Good Luck and have fun in Tallinn!!
Btw., I took the liberty to do some advertisement ...
http://www.aphog.de/forum/viewtopic.php?f=5&t=21492
cheers,
Bernd
Dear Matze,
concerning your digiKam color negative tool I can add technical data for Agfa films which are gone already.
I am using the Portrait 160 by myself but so far scanning results are not quite good.
Let me know if you are intereted in getting the technical datasheets.
Cheers
Timo
Hi, short question:
I tried scanning/converting a Fuji Superia 200 film, using a scan from Skanlite. The conversion results with the plugin where still too blue, even after using the color pipette tool from your plugin in Digikam on the parts of the film in between the pictures.
Next try was, using the Vuescan demo (will buy it once I know it works good for me), scanned using a color depth of 48 bit, saved as tiff (white balance and all filters off, scanned in "picture" mode). Still the white balance after the conversion isn't working properly. Could you give me a hint what I did wrong? Like, did I missed a setting in Vuescan to get a working scan for the plugin-film-profile? Or do I need to save in raw? Or need to calibrate my scanner somehow before? Or are there different versions of the Superia? Bought mine just this summer...
Am still a scanning beginner, used before mostly Epson's original software which was mostly ok, but isn't running on Linux...
I was referred to your blog post by a customer and read it. Since you are working on an open source project I decided to comment on what you’re trying to do...
Inverting negatives by subtracting each pixel value from a maximum value like you seem to do with your tool really is nonsense physically. For that to work intensity values would have to be additive which they are not. For photographic media it's the densities that are additive and the multiplication and division of intensity values equals the addition and subtraction of densities.
Bottom line: You are subtracting where you really should divide. Most other software products also follow this flawed logic and we had to work on a physically correct system for several years. The actual physical relationship between negative and positive is quite extreme. You can read more about it in one of our early technical papers at: http://www.colorneg.de/manuals/CFS244.pdf
In addition using Gammas to color balance also is wrong. Maybe this companion document to the one I first mentioned can help you understand why that is: http://www.colorneg.de/manuals/CFS243.pdf
Congrats for the tool. I did something similar, but much, much simpler:
https://sites.google.com/site/negfix/
What I've learned so far, that earch roll is different and there is no point to create the profile, especially if you do your own C-41. Each run is different.
Hello all,
I am very interested in this project. Having set up a system similar to this
http://foto.beitinger.de/dias_digitalisieren/
I found that even fotographing negatives is feasible with sufficient quality. I used a modified slide cutter (like this: http://www.foto-mueller.at/shop/media/images/k2115_big.jpg) for the transport and the projector only as the light source.
However, when I tried your digikam tool I found that the whitebalance has a tremendous effect on the outcome. Using simple manual color inversion plus whitebalance (on the margin) often lead to similar (sometimes better) results.
My question: How to apply your approach for optimal results in my setting?
Thanks
Marcus
Hello all,
I like the idea very much. Personally I have not used a scanner but a system similar to this (using a D90 with 1:1 macro and RAW format): http://foto.beitinger.de/dias_digitalisieren/
For negatives I used a modified a slide cutter between projector and camera - the projector serving only as light source.
When I run the tool on my fotographed negatives, the white balance has a big effect on the result. Manual inversion and white balance on (inverted) margin often has better results. What I wished would be an automatic tool also for fotographed negatives. Any ideas?
ciao
Marcus
Hi,
just tried the Windows Version, but the application crashed every time.
Tried to open the TIFF (16bit): crash. Reduced to 8bit jpeg:crash. Reduced to jpeg 50% size:crash.
Maybe it depends to windows ... It's a pity, because I need Windows for
my Nikon Scan application and color management.
Thank you
Ralf
Hi Ralf,
I'm not familiar with the Windows version, but maybe if you were able to provide a TIFF sample file I can check if the problem exists in the Linux version, too. Then I can probably get it fixed.
Sorry for keeping you waiting for so long. I've not visited the blog for a while and the notification about comments awaiting moderation didn't reach me.
Hi Marcus,
in principle there should be no difference whether you scanned or photographed the negative. It is however most important to start from the RAW file and not apply any white balance corrections or tone mapping. A straight, linear developed RAW should work just as well as a raw scan. If you could provide a sample image I can have a look at what is going on.
JaZ, I actually took a look at negfix when I developed my tool and was looking for inspiration. I would be interested to see scans from other people because all testing so far was done on material developed in the same lab, scanned with the same scanner, using the same profiles. There the results were pretty consistent from roll to roll. Only Kodak Ektar and also the new Portra films are still a riddle to me.
Hi Christoph,
thanks for the pointers to these documents. I'll have a close look at them. I was searching for material explaining the relationship between density and intensity before I started, but probably my research was not broad enough. I'm pretty sure you're correct about the additive vs. multiplicative remark. The densities are "linear", but on a logarithmic scale. The resulting intensities produced by the scan can therefore only be linear on a logarithmic scale, too. What my tool does is a linear scaling of the intensities to match a given profile, and then trying to adjust the gamma to fix up for the error created in the first step. It's clear to me now that this is not the correct approach.
Hi,
I'm sorry for the delay in answering the comment. Regarding your problem, I could probably help you diagnose the issue if you were able to provide a sample file. It's most important to have a scan that is unaffected by any processing of the scan software. No gamma correction, no white balance adjustment or tone mapping, and so on. Think of the scan as the equivalent to a digital cameras RAW file. But going by your explanation I think you did work out the correct settings for Vuescan. What helped me with getting good results from Vuescan was to profile the scanner using a SilverFast IT8 target.
All in all I found that Fuji Superia is a very easy film to scan.
Hi Timo,
Yes, I'd be interested to have the data sheets.